Friday, September 28, 2012

Toxic Treats Swap

Hi!

Another quickie post as I'm still working on the paperwork side of the business!

Each month I host a meeting or get together of some sorts for my INKin' All Night! demonstrator team and we always swap cards for ideas!  So for September our theme was "Fall or Halloween" and I chose do make this card!  Hope you like it!  And I figured I'd better get it posted because our next meeting is a Shoe Box Swap and it's only days away!  I love getting together with my team!


I used the Neutrals DSP for the background paper, stamped the fence/bird directly to it and then there is the Lace Doilie sizzlit die cut with basic black card stock, and then some strips of a coordinating pattern dsp and the striped gray/black ribbon for the little flag dealies, and the main image and greeting are from the fabulous set Toxic Treats from the Holiday Mini Catalog ... die cut out with the amazing coordinating framelits! 

Thanks for stopping by, I hope you like my 'new place' ... no place like home, there's no place like home

Hugs
Rhonda

Thursday, September 27, 2012

Clean and Simple, it's a CASE

Howdy!

Today needs to be quick, I have to make the hubby happy and work on the 'paperwork' side of my business today.  I came across a card from Debbie Henderson and it just made me happy, so I decided to dig out the set and get started!  Gotta LOVE putting ink to a new stamp set!  I didn't have much time so I pretty much CASEd (Copy And Share Everything) it, other than modifying to fit the designer series paper that I had on hand, which led to a slight change in colors & ribbon.  Thanks Debbie for the inspiration!


This card uses several NEW and FUN products!  The Friendship Preserves stamp set, Lucky Limeade and Calypso Coral ink pads, which are the colors in the piece of Floral District Designer Series Paper, Lucky Limeade Ruffled Ribbon and the layers were cut out with the Window Frames Collection of framelit dies -- these puppies make hand trimming a thing of the past -- and the coordinating Paper Piercing Pack with our new Piercing Tool and Mat, and the fun detail on the top is acheived using the Delicate Designs TIEF (textured impression embossing folder).  Sounds like a mouthful but seriously this card came together so quickly -- you'll probably see it in a card class later this month!

If you would like to order any of the items featured in the card or any other product, you can order online anytime from the convenience of my website and you can view the catalog, holiday catalog and simply click the shop now button!  thanks!

Have a great day!
Rhonda

Wednesday, September 26, 2012

October Class Sneak Peeks!

Hi!
Sorry I have been absent from the blog, but I promise I have things to share!  If you are on my customer email list you recently received an invitation to my upcoming October Classes and my Monthly Stampers Club.  I thought I would share a sneak peek here now that I have the photos ready!  If you live in the Phoenix area and would like my customer newsletter for class, specials and other SU! updates --- please email me at inkinallnight@cox.net and I'd be happy to add you!

My fellow demonstrator friend Elizabeth and I are participating in an Expo show in Mesa, AZ in November.  We are each teaching a class and working a shared booth offering make-n-takes and selling hand made cards all day.  Mesa Marriott, Sat Nov 3rd -- Rubber Stamp and Scrapbook Expo eXchange Event.

Here is the picture for my class --
I am also teaching this class NEXT WEEK in my home for my customers.  Class fee is $25.00 and includes all 7 projects and about $23 in take home product too!  I only have a couple of seats open, so hurry if you are interested in joining in the fun!  You can call, email or message me! 

Holiday Cards & Gift Packaging:
Class is Friday, October 5th from 7-8:30 pm or Saturday, October 6th from 10:30am-12noon.
4 cards and coordinating envelopes,3 gift packaging ideas and you'll also receive a Tombo Liquid Adhesive, Rhinestone Jewels, Crumb Cake Seam Binding Ribbon and a package of the Cherry Cobbler Bakers Twine


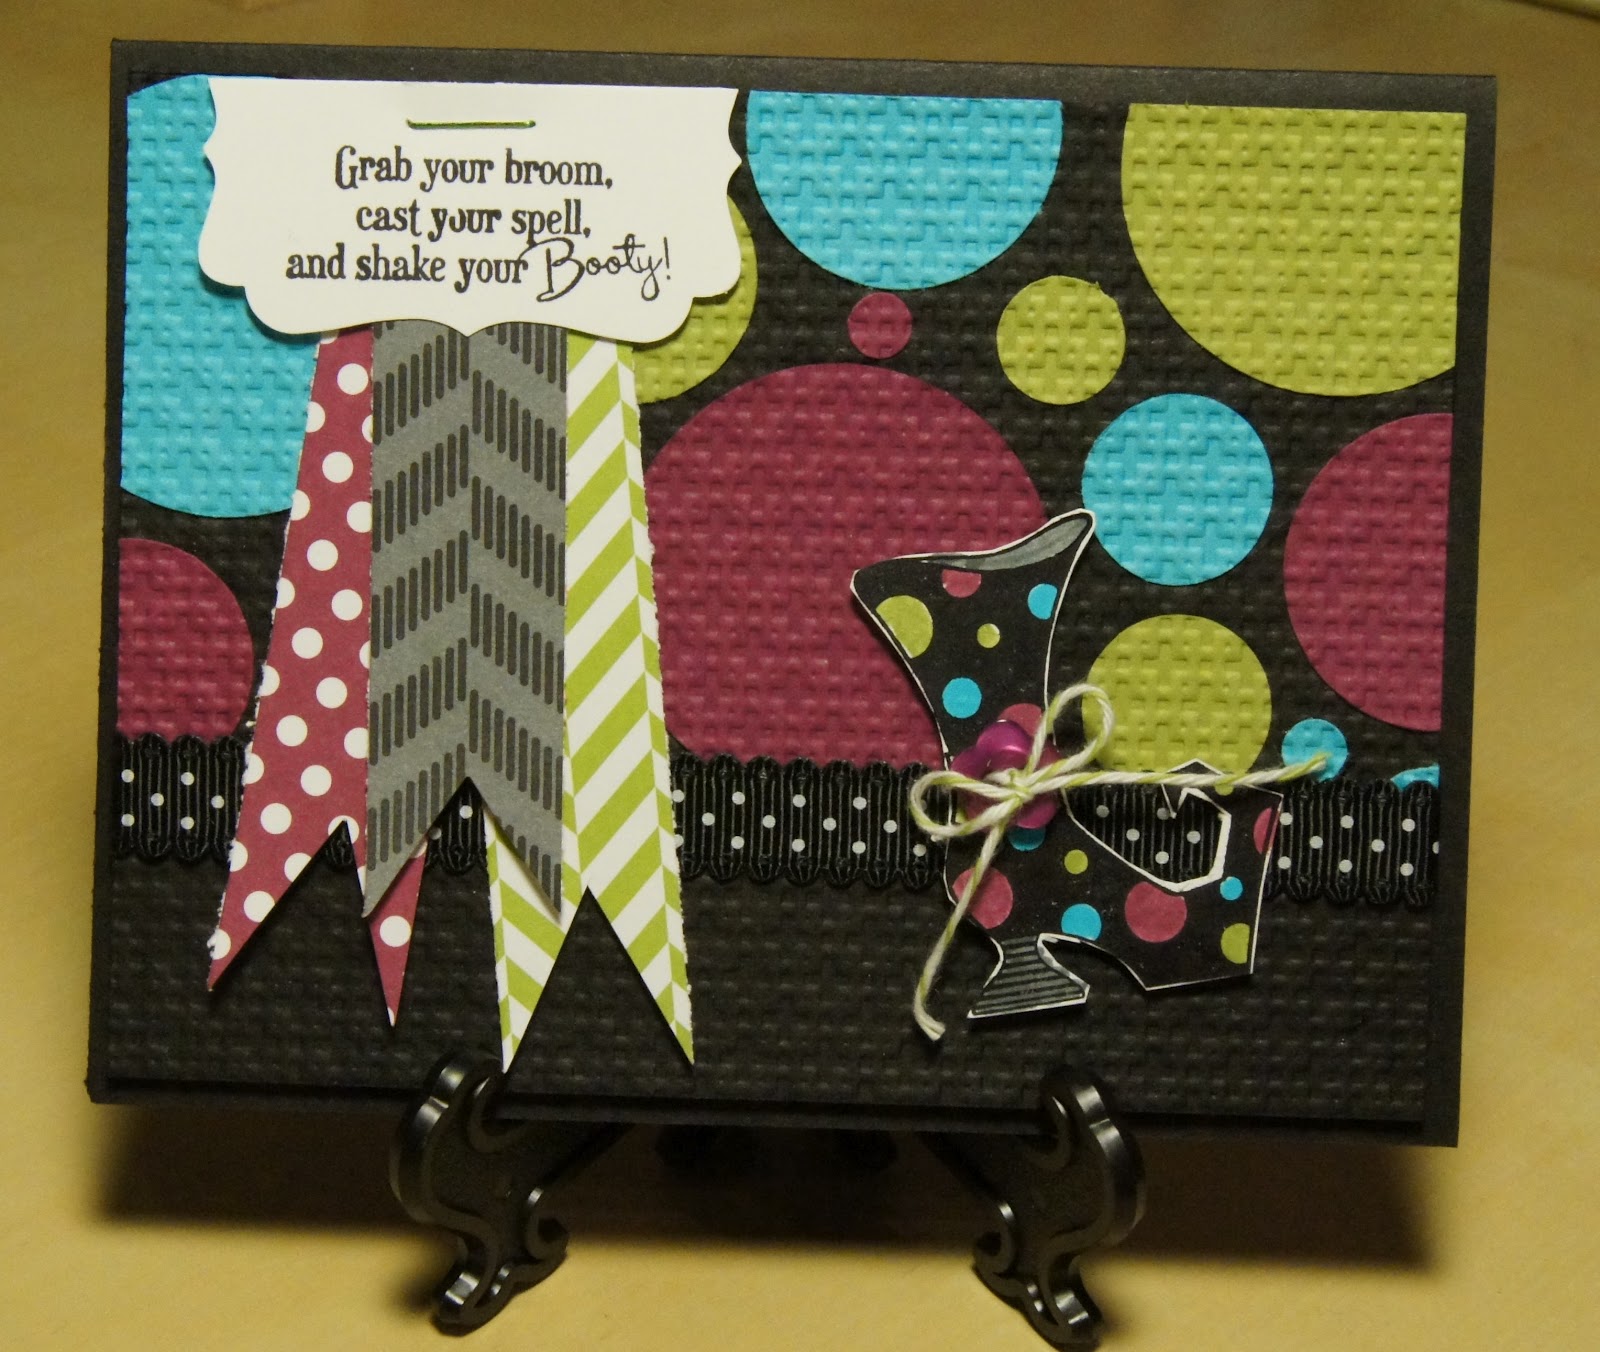
And I also have a Halloween Treats & Greets class too.  I am still working on the finishing touches for the rest of the projects but I do have a few things sampled up and ready to show you!  Here's a little teaser of just a few of the things you'll be making!


Wednesday, Oct 17th, from 7-8:30 pm orThursday, Oct 18th from 10:30a-12n, Class fee $15.00

This class will be a mix of cute and quick TREATS that you can have ready to hand out to those special folks and there will also be a couple of cards with haunting GREETingS to send out too!

Thanks for stopping by my new blog!!  Leave me a comment and let me know what you think!  I am still working on getting some cute stuff together to have a custom header and some fun buttons ... I'm giving myself lessons in MDS and working on things but don't hold your breath, it may take a little while!

Happy Stamping!
Rhonda


Saturday, September 22, 2012

Last of the BOOTIFUL works!

Hi

Hope you are having a great start to your weekend!  Going to try to keep this post short and sweet!  So at the end of our play date, we had that awesome stack of BOOTIFUL cards so we decided that we needed something to put them in.

We found the directions online or in Pinterest is my guess ... here's what we came up with!  The box is made with one sheet of 12x12 paper and scored using the diagonal score tool and our Simply Scored board.

We stamped and I went to town coloring and coloring and coloring ... a mindless couple of hours I think...  but in the end, I actually really like all the boots being colored in!

We added the Belly Band of black to give it a little bit more firmness since we stamped on Whisper White.


And then we made this yummy yummy flower and topped it off with a Faceted Button! We used the Blossom Punch, several layers and misted them with water, scrunched them up, and even sliced in between each petal towards the center so it'd fluff up a lot!


And here we are with the finished box and all of the cards with their coordinating decorated envelopes!  I really love it so I don't know if I can part with it but it sure would make a great gift for someone!  I hope you have enjoyed seeing the results of my 'play dates' ...!  We do have a good time!


Thanks and have a great day!
Rhonda

Thursday, September 20, 2012

More BOOTIFUL-ness!

Hi
I wanted to share some other BOOTIFUL creations with you!  Here are a few other cards that I made during our play dates as we like to call them!  Makes it sound youthful and it pretty much describes our time perfectly!

This card is a combination of inspiration from a few other cards ... we just picked elements from cards that we found online or wherever and went to work (I mean play!).

There is a black base for the card, and then there is a black layer 1/4" shorter each way -- on this layer we placed several circle punches from a variety of sizes filling up about 2/3rds of the layer.  We then ran it through the square lattice TIEF (textured impressions embossing folder) -- this effect is so cool it makes all those circle punches look like are melted right into this layer!  We added some flag strips (so in right now) in coordinating colors from our designer series patterned papers, stamped a greeting and punched it out, stapled it on!  Then wrap some polka dot black scallop ribbon around (never too many dots!) and finally stamped the Funky Boot in black and used the markers to color it in, trim it out and add a button tied off with some of our fabulous bakers twine and set up with dimensionals.    WHEW!


And for this next guy I decided to use the little border hearts TIEF along the top and bottom edge of the card, and it's a strip of DSP and a small scallop edge of the dotted ribbon scallop punch.  The boot was stamped in Midnight Muse ink and colored in with the markers.  Add a flower punch and a Summer Starfruit Dahlia and some coordinating ribbon and a glimmer brad!  Tah-dah!


And this card I do believe was our first card of the day.  It is basically a CASE (copy and share everything) from another talented stamper (will have to come back and edit to see if I can find who it might have originated from) and we changed it up a bit with different ribbon and I think we added the extra layer of gumball green!  This is also the same trick where the 3 layers of red/green/yellow were all mounted and then run through the Chevron TIEF for this card!  Love it!


I hope you enjoy these BOOTIFUL cards and come back again soon! 

Thanks for stopping by!
Rhonda

Tuesday, September 18, 2012

BOOTIFUL warm wishes


Hi
Well, it's not Monday and I missed posting yesterday!  I spent yesterday driving down to Tucson to pick up Nicole from U of A to head back up to Phoenix for a doctors appointment (her 3 mo surgery post op).  We grabbed a quick lunch to eat in the car on the way back down to Tucson.  Made a really quick stop, barely got a hug and then I was on the road again, stuck in the slowest moving traffic jam ... it finally opened up and eventually made it back to the house!  All said, I think I was gone close to 10 hours!  Seriously and it's really only about an hour and 45 minutes from our exit to her dorm ...

So for today, here's another project & a tip from my BOOTIFUL play date with Elizabeth!


This card was one of our last cards to make that day, as we both weren't in love with the holiday boot, but we combined several things from here and there and this is what we ended up with (and remember to make sure your envelope is cute too!).  New textured impressions embossing folder, framelit die cut for the red polka dots layer, and the white layer beneath the boot too, then the cool trick of adding a layer to it, new gumball green ribbon and tied off with some baker's twine and a tag --- oh and TONS of dazzling details glitter glue!  We stamped the boot actually 3 times, once on red polka dot dsp, then cut out boot section (not the top cloud puffy section or off to the side pom pom, and 2 times on white.  On one of the white layers you cut out everything, this becomes your base layer, then you piece your polka dot layer on, and then you add the very last layer of white which is the top puffy cloud and the little pom pom that is on the boot (polka dot side) - to bring the white glittery pom pom back to the top!

note: never mind the hole punches ... this is actually a picture for a tutorial that's coming up later for another project Here's a picture showing you how to create the layer around the framelit (which is the white layer), you simply measure and add a rectangle of choice color (gumball green) and then the 1" circle punch is added to each edge around the rounded part!  Tah-dah!!!  A perfect layer that is easy peasy!

Have a great day!  See you tomorrow!
Rhonda


Sunday, September 16, 2012

I had a BOOTIFUL play date!

Hi
I hope you are having a great weekend and getting to do some fun, creative things! One of my very dear friends Elizabeth called the other day and said, hey do you wanna come over and play?  Well, I said absolutely, see you in an hour ... I brought the stamp set BOOTIFUL OCCASIONS and some designer series papers, and off we went.

Here's what we did!  I may spread it out over a few days but I will show you all of the projects because it was super fun!  We had each pulled some favorites from the web to get our own creative juices going, sometimes its fun to CASE (Copy And Share/Steal Everything) but more times, we start with a layout or color combination or just have a certain piece of the project that you like ...  so, thanks to the others that share their ideas online and I hope you can find some inspiration from our play date too!

Here's one of our personal favorite cards of the day!  It's not the first one we made, but we definitely were in our groove by the time we came to using the cowboy boot!  Here's the card and another angel so you can see the depth, we just kept adding more and more until we finally felt like it was complete!  We LOVE it, so I hope you do too!


We used the woodgrain textured embossing folder on the crumb cake layer, the red scallop was done using the large scallop edgelit, and the red polka dot lollie layer was created using the rosette die, the blue scallop ribbon layer was created using the BLUE RIBBON stamp set, and we added some Midnight Muse ribbon to the ribbon tails to give it just a bit more texture.  We stamped the boot and just colored in pieces and hand cut it out and added some twine to give us a lasso to complete the cowboy look.  

Thanks for stopping by and come back soon!
Rhonda

Friday, September 14, 2012

LAST DAY - save 31% on Digital Downloads

Hi


I just wanted to give a quick shout out that today is the last day to save 31% on several My Digital Studio downloads!  Be sure to check out the list of what's on sale and get yours today!  These can be used in the Stampin' Up! digital scrapbooking and crafting software - MDS My Digital Studio - or you can simply use the files in other software that utilizes digital artwork!  It's one of the hottest trends right now, life is very busy and everyone is moving quick, so jump on board and give 'digital' a try! 

And you can try MDS2 (newly released version 2 of the software) FREE for a 30 day Trial!!  Just click
 FREE TRIAL

Visit my website and get started today! 
Thanks for stopping by!
Rhonda

Wednesday, September 12, 2012

Only a few more days left!!

Hi
I'm setting up shop with a new look on my blog, so I have been busy behind the scenes ... and I don't want anyone to miss out on this fabulous special offer!!  Joining Stampin' Up! is so easy now, for just $99 and it's 100% customized to whatever product you want in your starter kit!  And if you join my team NOW before Sept 16th, you will also receive this special PRINTER's TRAY KIT!!